A Complete, In-Depth Master Recipe Guide
Introduction
Homemade Chocolate Lasagna is a timeless, no-bake dessert that layers rich chocolate flavor with creamy textures and a satisfying cookie crust. Despite its name, it contains no pasta — instead, it earns the title “lasagna” from its beautifully stacked layers that mirror the structure of the Italian classic.
This dessert has become a staple at potlucks, family gatherings, holidays, and celebrations because it delivers maximum indulgence with minimal effort. It requires no oven, no advanced techniques, and no special equipment, yet the final result looks impressive and tastes like a bakery-quality dessert.
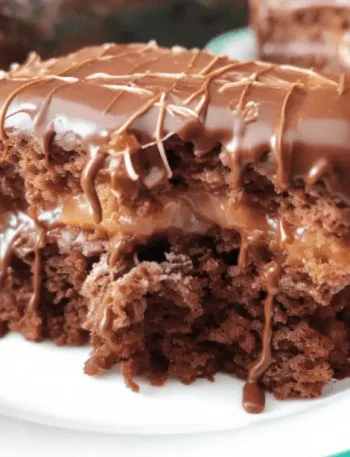
Chocolate Lasagna balances sweetness, creaminess, and texture:
• A crunchy Oreo cookie crust
• A smooth, lightly sweetened cream cheese layer
• A thick chocolate-vanilla pudding center
• A fluffy whipped topping finish
Each layer plays a specific role, and when assembled correctly, the dessert slices cleanly, holds its shape, and melts in the mouth.
This guide walks you through everything — not just how to make it, but why each step matters, how to fix mistakes, how to customize it, and how to perfect it every time.
What Is Chocolate Lasagna?
Chocolate Lasagna is a chilled, layered dessert traditionally made in a rectangular dish and served in squares. It originated in American home kitchens as a practical, make-ahead dessert that uses pantry staples and store-bought convenience ingredients.
The classic version uses:
• Oreo cookies for the base
• Cream cheese and whipped topping for richness
• Instant pudding for structure and stability
Unlike baked desserts, Chocolate Lasagna sets through refrigeration, allowing the layers to firm naturally without heat. This makes it ideal for warm weather, large gatherings, and advance preparation.
Why This Dessert Works So Well
The success of Chocolate Lasagna lies in contrast and balance.
• Crunch vs cream
• Sweet vs mildly tangy
• Dense layers vs light topping
Each ingredient is chosen for function as well as flavor. The pudding provides structure, the whipped topping adds airiness, and the cookie crust anchors the dessert so it doesn’t collapse.
Because it is no-bake, the flavors remain clean and fresh, and the texture stays soft rather than cakey.
Equipment You’ll Need
• 9 × 13-inch baking dish (glass preferred)
• Food processor or rolling pin
• Mixing bowls (at least 3)
• Hand mixer or stand mixer
• Rubber spatula
• Whisk
• Measuring cups and spoons
Ingredients (Full Breakdown)
Oreo Crust Layer
• 14.3 oz package Oreo cookies
• ½ cup margarine, melted
Purpose:
The Oreo crust provides firmness and crunch. The fat from the margarine binds the crumbs so the base holds together when sliced.
Important note:
Do not remove the cream filling from the Oreos. It contributes to binding and flavor.
Cream Cheese Layer
• 8 oz cream cheese, softened
• 1 cup powdered sugar
• 1 tub (8 oz) whipped topping
Purpose:
This layer adds richness and a slight tang that balances the sweetness of the pudding.
Texture goal:
Smooth, light, and spreadable — not dense or grainy.
Pudding Layer
• 1 (5.1 oz) box instant vanilla pudding
• 1 (5.1 oz) box instant chocolate pudding
• 3 cups cold milk
Purpose:
The pudding layer provides structure. It is the “backbone” that allows the dessert to slice cleanly.
Why instant pudding:
Cook-and-serve pudding does not set the same way and can cause separation.
Topping
• 1 tub (8 oz) whipped topping
• Chocolate syrup
• Chocolate curls or chopped chocolate (optional)
Purpose:
The topping softens the dessert visually and texturally, making each bite light rather than heavy.
Step-by-Step Instructions (Detailed)
Step 1: Prepare the Oreo Crust
- Place the Oreo cookies into a food processor and pulse until fine crumbs form.
If using a rolling pin, seal cookies in a zip-top bag and crush evenly. - Transfer crumbs to a bowl and pour in melted margarine.
- Stir until all crumbs are evenly coated and resemble wet sand.
- Press firmly into the bottom of a 9×13 dish.
Use the bottom of a measuring cup to compact the crust evenly. - Refrigerate for at least 15 minutes.
Why this step matters:
A chilled crust prevents mixing with the cream cheese layer and ensures clean layers.
Step 2: Make the Cream Cheese Layer
- Beat softened cream cheese until completely smooth.
- Gradually add powdered sugar, beating until fluffy.
- Fold in whipped topping gently using a spatula.
- Spread evenly over the chilled crust.
Common mistake:
Spreading too aggressively can pull up the crust. Always spread gently from the center outward.
Step 3: Prepare the Pudding Layer
- In a large bowl, whisk vanilla pudding, chocolate pudding, and cold milk.
- Whisk for 2 minutes until thick.
- Allow pudding to sit for 3–5 minutes to fully set.
- Spread gently over the cream cheese layer.
Step 4: Final Topping
- Spread remaining whipped topping evenly.
- Drizzle with chocolate syrup.
- Add chocolate curls or candy if desired.
Step 5: Chill
• Cover tightly
• Refrigerate at least 4 hours
• Overnight is ideal
Why chilling is critical:
Proper chilling allows the pudding to stabilize and the layers to bond.
Serving Guidelines
• Use a sharp knife
• Clean blade between cuts
• Serve chilled
Storage Instructions
Refrigerator:
Up to 4 days, tightly covered
Freezer:
Up to 1 month (texture slightly firmer when thawed)
Troubleshooting Common Problems
Too soft:
Insufficient chilling or over-mixing whipped topping
Runny pudding:
Milk too warm or not enough mixing time
Crust falling apart:
Not enough fat or insufficient pressing
Flavor Variations
• Peanut butter layer
• Mint chocolate
• White chocolate raspberry
• Espresso mocha
Why This Recipe Is a Crowd Favorite
• No baking
• Budget-friendly
• Make-ahead
• Customizable
• Foolproof
Final Thoughts
Chocolate Lasagna is not just a dessert — it’s a reliable, repeatable, universally loved classic. When made with care and proper layering, it delivers professional results with home-kitchen effort.