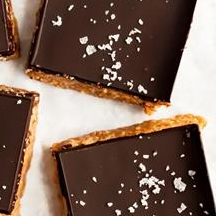
These High-Protein Peanut Butter Bars are chewy, creamy, and packed with peanut butter flavor while delivering 13 grams of protein per serving. This easy no-bake recipe makes a satisfying snack, quick breakfast option, or post-workout treat.

Recipe Card
High-Protein Peanut Butter Bars
A simple no-bake snack made with natural peanut butter, protein powder, almond flour, and a thin chocolate topping for a delicious balance of protein, healthy fats, and sweetness.
Prep Time
15 minutes
Chill Time
1–2 hours
Total Time
1 hour 15 minutes to 2 hours 15 minutes
Yield
12 bars
Dietary Badges
- High-Protein
- No-Bake
- Gluten-Free (when using certified gluten-free protein powder)
- Meal Prep Friendly
Ingredients
- 1 cup natural peanut butter
- 1 cup vanilla or peanut butter protein powder
- 2 tablespoons maple syrup
- ¼ cup almond flour
- ¼ cup chocolate chips
- 2 teaspoons coconut oil
- 1 teaspoon vanilla extract
- Pinch of salt
Instructions
- Line an 8×8-inch pan or loaf pan with parchment paper.
- Add peanut butter, protein powder, maple syrup, almond flour, vanilla extract, and salt to a large bowl.
- Mix until a thick dough forms. If needed, knead the mixture with your hands for 1–2 minutes until fully combined.
- Press the mixture firmly into the prepared pan, creating an even layer.
- Melt chocolate chips with coconut oil until smooth.
- Spread the melted chocolate evenly over the peanut butter layer.
- Refrigerate for 1–2 hours until firm.
- Remove from the pan, slice into 12 bars, and serve.
Recipe Notes
- Use natural peanut butter with a smooth consistency for the best texture.
- Protein powders vary in absorbency, so adjust slightly if your mixture feels too dry.
- Keep refrigerated for the firmest texture.
- For a lower-carb option, use sugar-free chocolate chips and a low-carb sweetener.

Why You’ll Love These High-Protein Peanut Butter Bars
Finding a snack that tastes like dessert while supporting your nutrition goals can be challenging. These High-Protein Peanut Butter Bars offer the best of both worlds: rich peanut butter flavor, a satisfying chewy texture, and a protein boost that makes them much more filling than traditional snack bars.
This recipe was designed for busy days when you need something quick, homemade, and ready to grab from the refrigerator. There is no baking, no complicated equipment, and no long ingredient list. Just mix, chill, slice, and enjoy.
The combination of peanut butter and protein powder creates a naturally creamy texture, while almond flour keeps the bars tender without making them heavy. A thin layer of chocolate on top adds just enough sweetness to make these feel like a treat.
Step-by-Step Cooking Guide
Prepare the Pan
Start by lining an 8×8-inch baking pan or loaf pan with parchment paper.
Leave some extra parchment hanging over the sides. This creates handles that make it easy to lift the chilled bars out before slicing.
Tip: If your parchment paper keeps moving, lightly grease the pan first so it stays in place.
Create the Peanut Butter Protein Mixture
Add the following ingredients to a large mixing bowl:
- Natural peanut butter
- Protein powder
- Maple syrup
- Almond flour
- Vanilla extract
- Salt
Stir everything together until the mixture becomes thick and dough-like.
The texture should be similar to cookie dough. It should hold together when pressed between your fingers.
Tip: If the mixture looks too dry or crumbly, add an extra teaspoon of peanut butter. If it feels too sticky, add a small amount of additional protein powder.
Knead for the Best Texture
Some protein powders absorb more liquid than others. If your mixture is not coming together easily, use clean hands to gently knead it for one to two minutes.
This helps distribute the peanut butter evenly and creates a smoother final texture.
Tip: Avoid overworking the mixture. Once the ingredients are combined, it is ready to press into the pan.
Press the Mixture into the Pan
Transfer the peanut butter mixture into the lined pan.
Use a spatula, spoon, or the bottom of a measuring cup to firmly press it into an even layer.
A tightly packed base creates bars that slice cleanly instead of crumbling.
Add the Chocolate Topping
Place chocolate chips and coconut oil in a microwave-safe bowl.
Heat in short intervals, stirring between each, until completely smooth.
The coconut oil helps create a softer chocolate layer that is easier to bite once chilled.
Spread the melted chocolate over the peanut butter layer.
Chill and Slice
Place the pan in the refrigerator for one to two hours.
The chilling time allows the bars to firm up and makes slicing much easier.
Once set, lift the bars out using the parchment paper and cut into 12 even portions.
Tip: For cleaner slices, warm your knife slightly under hot water and dry it before cutting.
Ingredient Details and Substitution Tips
Natural Peanut Butter
Natural peanut butter is the star ingredient in these bars. It provides the creamy texture, nutty flavor, and healthy fats that help create a satisfying snack.
Choose peanut butter made with simple ingredients, ideally just peanuts and salt.
Avoid peanut butter that has a very dry texture because it can make the bars harder to mix.
Protein Powder
Protein powder increases the protein content while adding flavor and structure.
Vanilla protein powder creates a classic dessert flavor, while peanut butter protein powder intensifies the peanut butter taste.
Whey protein usually creates a softer texture, while plant-based proteins may make the bars slightly firmer.
Almond Flour
Almond flour keeps these bars tender while adding a mild nutty flavor.
Use finely ground almond flour for the smoothest texture.
Maple Syrup
Only a small amount of maple syrup is needed to balance the flavor of the protein powder and peanut butter.
It adds sweetness without overpowering the recipe.
Chocolate Chips
The chocolate topping adds a dessert-like finish without requiring a thick coating.
Dark chocolate works especially well because its slightly bitter flavor complements the peanut butter.
Ingredient Substitutions
| Ingredient | Substitute |
|---|---|
| Peanut butter | Almond butter, cashew butter, or sunflower seed butter |
| Almond flour | Sunflower seed flour |
| Maple syrup | Sugar-free maple syrup or honey |
| Chocolate chips | Dark chocolate chunks or sugar-free chocolate chips |
| Coconut oil | Butter or neutral oil |
Equipment Alternatives
- No 8×8-inch pan? Use a loaf pan for thicker bars.
- No microwave? Melt the chocolate using a bowl placed over simmering water.
- No parchment paper? Lightly grease the pan, although parchment makes removal easier.
- No spatula? The back of a spoon works well for smoothing the layers.
Recipe Variations and Serving Suggestions
Chocolate Peanut Butter Protein Bars
Add 1–2 tablespoons of unsweetened cocoa powder to the peanut butter mixture for a richer chocolate flavor.
Crunchy Peanut Butter Bars
Mix in ¼ cup chopped roasted peanuts for extra texture.
Cinnamon Peanut Butter Bars
Add ½ teaspoon cinnamon for a warm, bakery-style flavor.
Coconut Peanut Butter Bars
Mix in 2 tablespoons unsweetened shredded coconut for a tropical twist.
Lower-Carb Version
To reduce carbohydrates:
- Use sugar-free maple syrup.
- Use sugar-free chocolate chips.
- Choose a low-carb protein powder.
Dairy-Free Version
Use a plant-based protein powder and dairy-free chocolate chips.
Extra Protein Version
Increase protein slightly by adding another tablespoon or two of protein powder while adjusting peanut butter if needed for texture.
Serving Suggestions
These bars are delicious straight from the refrigerator, but they can also be served in different ways:
- Pair with Greek yogurt for a higher-protein snack.
- Enjoy with fresh berries for a balanced breakfast.
- Serve alongside coffee for an afternoon treat.
- Crumble over yogurt bowls for added texture.
For a dessert-style serving, drizzle a small amount of melted peanut butter over the top before serving.
Storage and Make-Ahead Information
Refrigerator Storage
Store the bars in an airtight container in the refrigerator for up to one week.
Place parchment paper between layers if stacking them to prevent sticking.
Freezer Storage
These bars freeze very well.
Wrap individual bars tightly and store them in a freezer-safe container for up to three months.
Thawing Instructions
Allow frozen bars to sit at room temperature for 10–20 minutes before eating.
They can also thaw overnight in the refrigerator.
Make-Ahead Tips
Prepare a batch during weekly meal prep and portion them individually for easy snacks throughout the week.
Because they keep well, they are a convenient option for busy mornings, gym bags, or afternoon cravings.
Quality Notes
The bars are firmest when cold but become slightly softer and chewier at room temperature.
For the best texture and flavor, keep them refrigerated until ready to enjoy.
Nutrition Information
Per Bar (Approximate)
| Nutrient | Amount |
|---|---|
| Calories | 165 kcal |
| Protein | 13 g |
| Carbohydrates | 8 g |
| Net Carbs | 6 g |
| Fat | 11 g |
| Saturated Fat | 3 g |
| Fiber | 2 g |
| Sugar | 3 g |
Dietary Highlights
- High in protein
- Moderate in healthy fats
- Lower in sugar than many traditional snack bars
- No-bake recipe
- Gluten-free when prepared with suitable ingredients
Allergens
Contains:
- Peanuts
- Almonds
- Dairy if using whey protein or milk chocolate
Frequently Asked Questions
Can I use a different type of protein powder?
Yes. Whey, casein, and plant-based protein powders can all work. The texture may vary slightly depending on how much moisture the powder absorbs.
Why are my bars too dry?
Protein powders differ significantly between brands. If your mixture is dry, add a little more peanut butter or a small splash of milk until the dough becomes easy to press.
Can I make these bars without chocolate?
Yes. The chocolate topping is optional. The peanut butter layer is flavorful enough on its own.
Are these High-Protein Peanut Butter Bars good for meal prep?
Absolutely. They store well and can be prepared ahead for quick snacks throughout the week.
Can I freeze these protein bars?
Yes. Freeze them individually wrapped for up to three months.
Can I use crunchy peanut butter?
Yes. Crunchy peanut butter adds extra texture and works especially well if you enjoy nutty pieces throughout the bars.
How do I make the bars firmer?
Chill them longer or store them in the refrigerator until ready to serve.
The Story Behind These Protein Bars
These bars were created with the goal of making a protein-rich snack that feels like a homemade dessert instead of a typical health food. Many packaged protein bars can have artificial flavors or a dry texture, so this recipe focuses on simple ingredients and a satisfying homemade taste.
During testing, increasing the protein powder helped improve the nutritional profile while reducing the maple syrup kept the sweetness balanced. The result was a bar that still tasted like classic peanut butter candy but offered more staying power.
The thin chocolate topping became the finishing touch. Instead of covering the entire bar in chocolate, a lighter layer adds richness while allowing the peanut butter flavor to remain the star.
These High-Protein Peanut Butter Bars are now a reliable option whenever you need something quick, flavorful, and filling. Try adding your favorite mix-ins, experiment with different protein flavors, and share your favorite version with others. Leave a rating and let us know how you enjoyed these homemade protein bars.